Why grow microgreens inside
Why grow microgreens inside? It’s not just a chef’s trick for making plates look pretty. Microgreens are easy, super quick, and honestly, you can set them up almost anywhere—even if all you’ve got is a little shelf in the kitchen.
They’re speedy. Most kinds are ready for picking in just a week or two.
No backyard needed. A single 10×20 tray on a sunny windowsill can give you enough greens for several meals.
They’re little powerhouses—loaded with vitamins C, E, K, tons of beta-carotene, and antioxidants.
You’re in control when you grow indoors. Set the light, the temperature, and tell bugs to take a hike. So, you get a steady supply, snowstorm or sunshine.
If you want to give it a go, here’s what you need:
Microgreen seeds: Organic, untreated, made for sprouting or microgreens works best.
Trays: You’ll want a pair—one with holes to drain, one solid tray for catching water.
Seed-starting mix: Something light, like coconut coir or peat moss, does the trick.
Lights: Skip this if your window gets full sun. If not, a basic T5 fluorescent or LED grow light a few inches above the tray is perfect.
Spray bottle: You’ll use it to keep seeds moist in the beginning.
If you’re new, pick microgreens that grow fast and aren’t picky. A quick win makes it a lot more rewarding.
Variety | Days to Harvest | Flavor | Difficulty
Radish | 5–7 | Spicy, crisp | Super Easy
Broccoli | 7–10 | Mild, earthy | Super Easy
Sunflower | 10–12 | Nutty, sweet | Easy (soak the seeds first)
Pea Shoots | 10–14 | Sweet, fresh | Easy
Here’s how to do it:
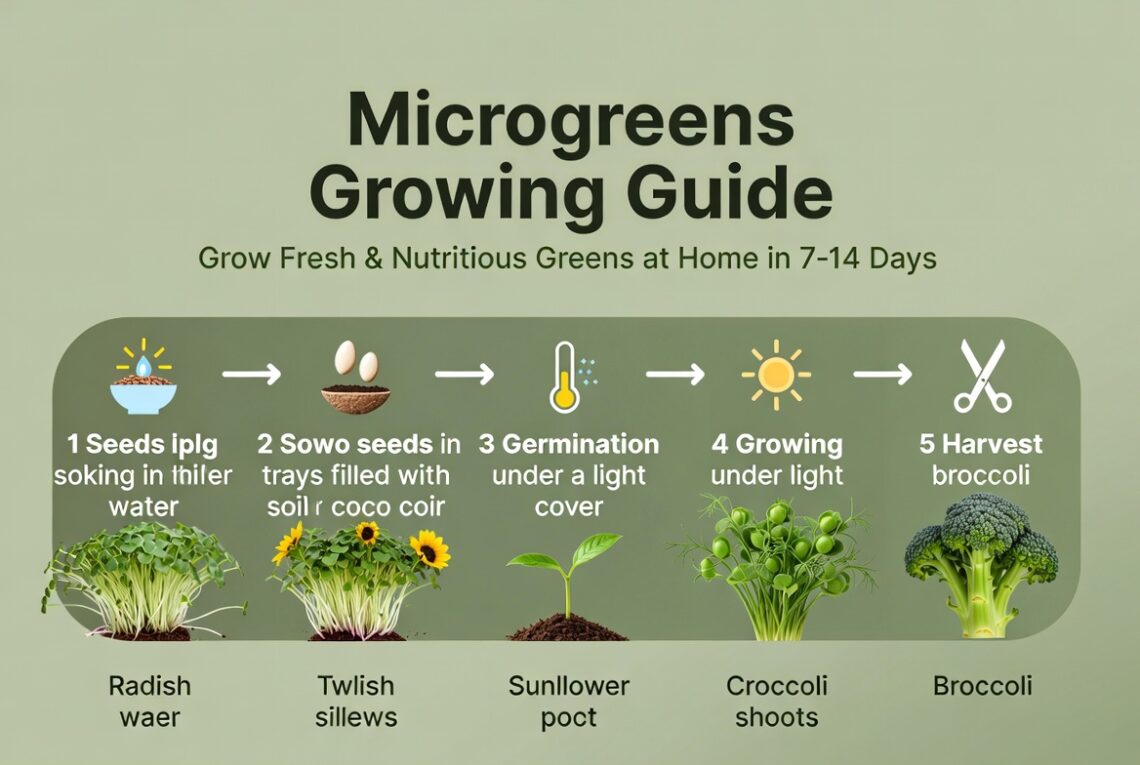
- Prep trays and soil.
Line the tray with holes, add an inch or two of damp seed mix, and pat it gently. The soil should feel moist, not soaking, not dry. - Sow your seeds.
Scatter the seeds thickly and evenly. No need to be perfect—a dense layer works well, just don’t heap them up. Mist them well. - Cover and weigh down.
Snap on the solid tray to block light. Then set something heavy (like a big book) on top. This helps the roots dig in and makes the stems sturdier. Keep it like this for two to four days, misting daily. - Add light and water from below.
When you see the seedlings start to lift the lid, it’s time for light. Take off the cover and put the tray under your lights. Pour water into the bottom tray, not on top of the soil. This keeps the leaves dry and cuts down on mold.
Harvest once you spot the first true leaves—usually when they’re about two to three inches tall. Use scissors or a sharp knife and cut them right above the soil.
One heads-up: Don’t wash your microgreens until you’re ready to eat them. Washing too soon turns them mushy in no time. Store them dry in a container lined with a paper towel in the fridge, sealed tight, and they’ll stay fresh for about a week.
If you run into problems:
Mold (fuzzy white stuff): That usually means too much water or poor airflow. Water only from below and run a small fan nearby to help.
Tall, skinny stems: They want more light. Move your lights closer (about two to four inches above) or leave them on longer.
With a little practice, you’ll have fresh, crunchy microgreens on hand all the time. It doesn’t matter if you’ve got a tiny apartment or the weather is a total mess outside.


You May Also Like
Macorner Home Decor: Where Modern Style Feels Like Home

Front Porch Makeover: Transform Your Home’s First Impression in 2026